|
Example 1Let's add a tab to the Ribbon. I assume you are familiar with HTML/XML and Excel's Visual Basic.First create a new document in Notepad and insert the following text (be careful, XML is case sensitive!): <customUI xmlns="http://schemas.microsoft.com/office/2006/01/customui">
<ribbon startFromScratch="false">
<tabs>
<tab id="customTab" label="Extra">
<group id="firstGroup" label="First Group">
<button id="button1" label="First button" onAction="YouHitMe1"/>
<button id="button2" label="Second button" onAction="YouHitMe2"/>
<menu id="menu1" label="Menu example">
<button id="menuButton1" label="First menu item" onAction="MenuChoice"/>
<button id="menuButton2" label="Second menu item" onAction="MenuChoice"/>
</menu>
</group>
</tab></tabs></ribbon></customUI>
Save it to the desktop as ExtraTab.xml
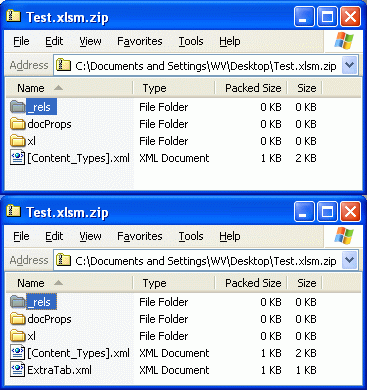
Now create a new workbook, save it to the desktop as Test.xlsm and close it. Rename it by adding the .zip extension to the file name so it becomes Test.xlsm.zip. Double click it. The file opens in a folder window. Double click the _rels folder and drag the .rels file to the desktop. Right click it and select Edit. Just before the final </Relationships> element at the end, add the following text: <Relationship Id="customUIRelID" Target="ExtraTab.xml" Type="http://schemas.microsoft.com/office/2006/relationships/ui/extensibility"/>This informs Excel of the existence and purpose of ExtraTab.xml. Save the file and drag it to the _rels folder and click yes to overwrite the original file. The Target attribute must be the exact path to the customization file. In this case ExtraTab.xml. No path here since it resides in the root of the zip file. If you prefer to create a customUI folder for example and put your customization file there you have to include the path: customUI/ExtraTab.xml Before testing you should open Excel Options, Advanced, go to the General section and check Show add-in user interface errors. Now Excel will warn you when an error occurs and give you an indication of its nature and location.
Remove the .zip extension from Test.xlsm.zip and double click Test.xlsm. If you didn't make any mistakes, your Ribbon should have an additional Extra tab at the end with two buttons and a menu.
Open VB editor, right click VBAProject(Test.xlsm) in the Project pane, select Insert, Module and insert the following text: Option Explicit
Sub YouHitMe1(Control As IRibbonControl)
MsgBox "Hello, you clicked 'First button'"
End Sub
Sub YouHitMe2(Control As IRibbonControl)
MsgBox "Hello, you clicked 'Second button'"
End Sub
Sub MenuChoice(control As IRibbonControl)
Select Case control.ID
Case "menuButton1"
MsgBox "Hello, you clicked 'First menu item'"
Case "menuButton2"
MsgBox "Hello, you clicked 'Second menu item'"
End Select
End Sub
By clicking a button now, you get a message box indicating which button you clicked. Simply modify the label text to suit you needs and change the macro to do something useful.
Suppose you want to add a group in the Extra tab that should only be visible when a particular sheet is active. Example 2 shows you how to do it. What about Personal.xlsm?When you want the Extra tab to be available in all workbooks, perform the above procedure with an Excel add-in file (.xlam). Personal.xlsm doesn't work here because it is a hidden file and also hides the Ribbon customizations. An add-in is also hidden but it does expose the Ribbon customizations.Create a new workbook and save it as an Excel add-in. In the Save As dialog type Personal for example as file name and select Excel Add-in (*.xlam) in the Save as type: drop down. Excel automatically selects the AddIns folder (typically C:\Documents and Settings\user\Application Data\Microsoft\AddIns\). Go to Excel Options and select Add-Ins. In the Manage: drop down, select Excel Add-ins and click Go.... In the Add-Ins dialog, check Personal and click OK. Now perform the example procedure with this add-in file. What about Word?You can use this example for Word as well. Simply replace Excel with Word, workbook with document, Test.xlsm with Test.docm and Personal.xlam with Normal.dotm. That's all.
| |

